A truly successful window installation involves more than just swapping out an old unit for a new one. It's a careful process that includes meticulous pre-installation planning, the safe removal of the old window, precise preparation of the rough opening, and finally, the expert setting, securing, and sealing of the new unit. For homeowners in Salinas and Monterey, following these steps correctly ensures a professional, energy-efficient result that genuinely enhances your home's comfort and value.
Your Pre-Installation Game Plan
A great window replacement starts long before you even think about picking up a tool. This pre-installation game plan is your most critical first step, especially for homeowners in Monterey County. Getting this part right is what prevents those costly mistakes and makes for a smooth, headache-free installation day.
This initial phase is all about doing your homework—careful planning and gathering the right information. If you rush this stage, you could easily end up with the wrong size window, accidentally violate local building codes, or find yourself missing a crucial tool mid-project. Think of it as creating the blueprint for your success.
Choosing the Right Window for the Central Coast
For homeowners living in coastal communities like Carmel or Monterey, selecting the right window material isn't just about looks; it's about durability. The salty air and persistent dampness demand materials that can stand up to corrosion, warping, and moisture damage.
- Vinyl Windows: A popular and budget-friendly choice, modern vinyl is fantastic at resisting moisture and requires very little maintenance, making it a practical option for our local climate.
- Fiberglass Windows: If durability is your top priority, look no further. Fiberglass frames don’t expand or contract with our coastal temperature swings, which means they maintain a consistently tight seal against wind and rain.
- Wood Windows: There's no denying the timeless beauty of wood, but it does require more upkeep here on the coast. If your heart is set on wood, make sure you choose a high-quality, pre-treated product and commit to regular maintenance.
For custom projects or unique designs, you can find incredible options from specialized providers like architectural glass suppliers like Bendheim. As a locally owned, family-operated business, we have decades of experience helping residents in Salinas choose the perfect windows for their homes.
Understanding Local Building Codes and Regulations
It’s a fact of life that building codes can differ from one city to the next, whether you're in Salinas or Pacific Grove. It's crucial for homeowners in Monterey County to check local requirements before starting any project. These codes often cover important safety rules for egress (emergency escapes) and specific energy efficiency standards.
A quick call to your local building department can clear up any questions and ensure your project is fully compliant. According to the U.S. Department of Energy, updated building energy codes can save homeowners an average of $162 annually, highlighting the importance of compliance.
Essential Tools and Materials for Window Installation
Having all your tools laid out and ready to go makes the entire process safer and far more efficient. Below is a checklist of what you'll need for a standard window installation. Having everything on hand before you start will save you from making frustrating trips to the hardware store mid-job.
| Tool/Material | Purpose | Pro Tip |
|---|---|---|
| Tape Measure | Accurately measuring the rough opening. | Measure three times (top, middle, bottom) and use the smallest measurement to ensure a good fit. |
| Level (4-foot) | Ensuring the window is perfectly plumb and level. | A longer level gives you a more accurate reading across the entire frame. |
| Pry Bar & Putty Knife | Removing old trim, sashes, and sealant. | Use a block of wood behind the pry bar to protect your wall from damage. |
| Caulking Gun | Applying sealant and caulk. | A dripless caulking gun is worth the extra few dollars—it will save you a ton of cleanup time. |
| Power Drill/Driver | Securing the new window frame with screws. | Keep a spare charged battery on hand so you don’t have to stop and wait. |
| Safety Glasses & Gloves | Protecting your eyes and hands from debris. | Don't skip these! Shattered glass and sharp edges are a real risk. |
| Shims | Leveling and plumbing the window in the opening. | Composite shims are great for coastal areas as they won't rot or swell if they get wet. |
| Flashing Tape | Creating a waterproof seal around the window. | Apply it like you’re shingling a roof—bottom piece first, then sides, then top—to shed water correctly. |
| Low-Expansion Foam | Insulating the gap between the window and frame. | Use foam specifically designed for windows and doors; high-expansion foam can bow the frame and cause issues. |
This list covers the essentials for homeowners in Salinas looking to tackle this project. Depending on your specific window and home construction, you might need a few other items, but this is a solid foundation for any installation.
Taking the time to plan your project properly is, without a doubt, the most important part of this entire guide. For more details on the process, you can find our complete guide to home window replacement in Salinas.
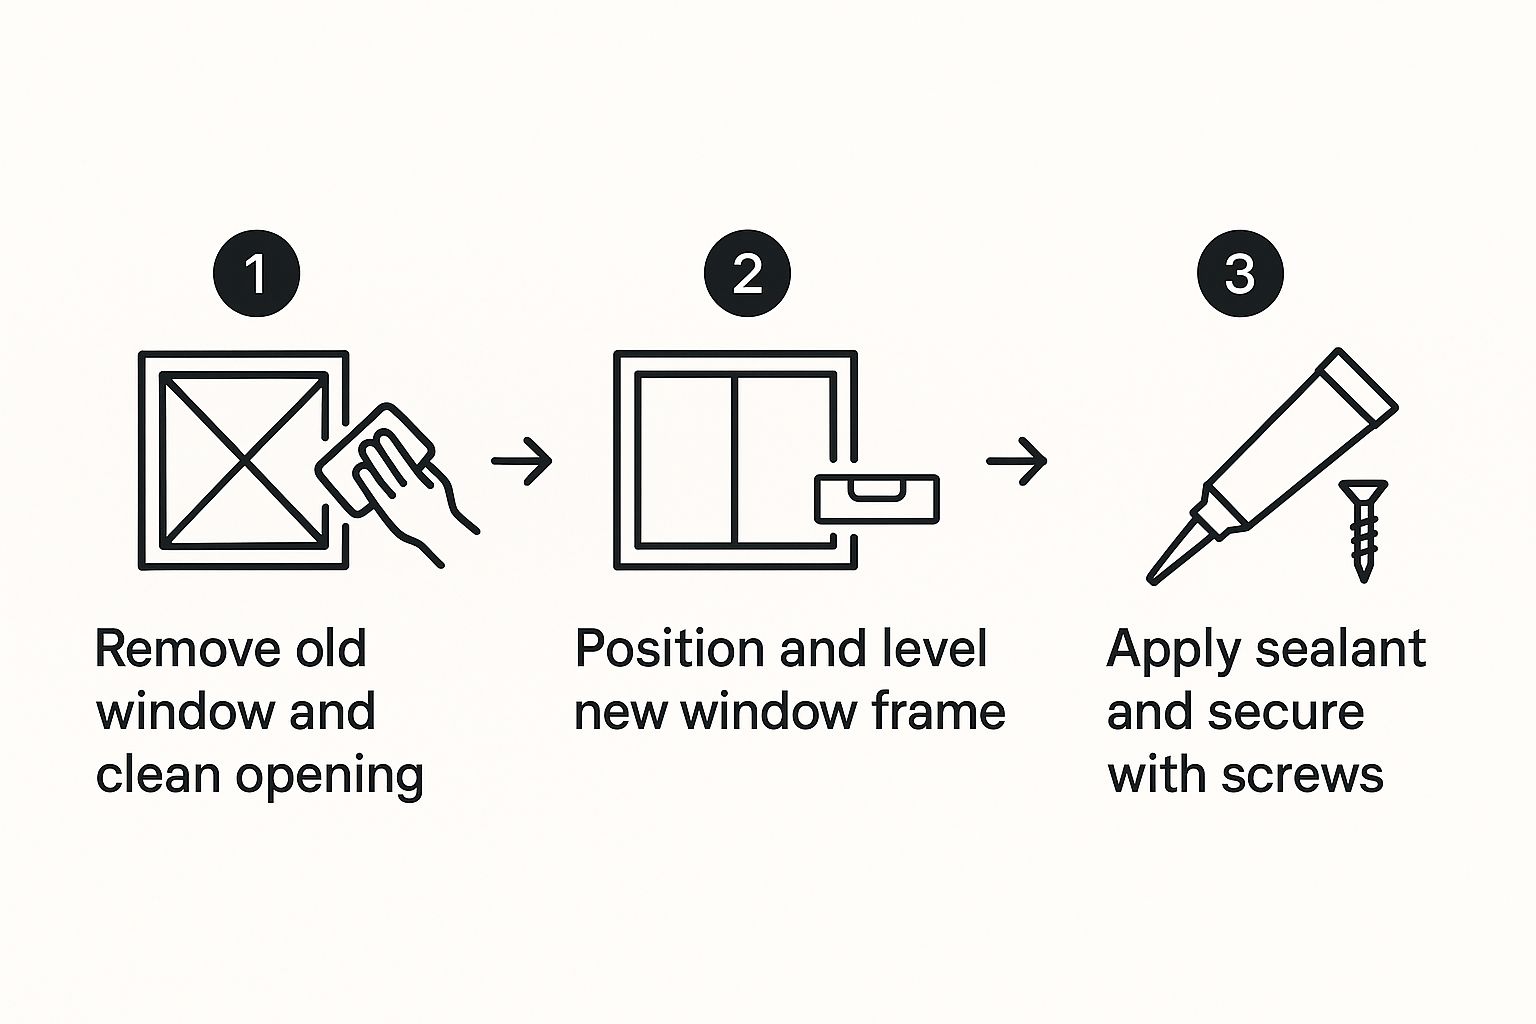
Removing Old Windows Without Damaging Your Home

Pulling out an old window is a delicate job that’s more about finesse than brute force. If you get impatient and just start ripping it out, you’re asking for trouble—damaged siding, cracked drywall, or even a compromised structural frame. The real goal here is to leave a perfectly clean, sound opening for your new window.
As a family-run business that’s been serving Salinas homeowners for decades, we’ve seen it all. From the old aluminum sliders common in the area to the classic wood-framed windows in historic Monterey homes, every window has its own removal quirks. Patience is your best friend during this stage.
Preparing for a Clean Extraction
Before you pick up a pry bar, you need to clear the area by taking down any blinds, shades, or curtains. Most windows also have interior trim or molding that needs to come off first. Be gentle here, or you risk splintering the wood and gouging your drywall.
Start with a utility knife and score the caulk line where the trim meets the wall to keep the paint from peeling off with the wood. Next, slide a stiff putty knife into the gap, followed by a pry bar. Use a small wood block behind the pry bar to protect your wall from dents as you gently work the trim loose.
Techniques for Different Window Types
How you take the window out really depends on what kind of window you have. An old wood double-hung window, for instance, comes apart in pieces. A modern vinyl slider, on the other hand, will likely come out as one whole unit once you’ve removed the fasteners.
- Wood Windows: These usually have sashes held in by wood "stops." You'll pry off the interior stops, lift out the bottom sash, cut the old sash cords, and then take out the top sash.
- Aluminum or Vinyl Sliders: With these, you typically have to lift the moving sash up into the top channel and pull the bottom out toward you. The fixed pane is often held in with screws or clips you’ll have to find before the frame itself can come out.
Stubborn windows are common, especially in coastal spots like Monterey where salty air causes corrosion. Don't be afraid to grab a reciprocating saw with a metal-cutting blade to carefully slice through any old nails pinning the frame in place, but be extremely careful not to cut into the house framing.
Cutting Old Sealant and Releasing the Frame
With the sashes and interior trim gone, only the old sealant and fasteners are left holding the main frame. Go outside and use your utility knife to cut the exterior caulk line between the window frame and your home's siding. This is a critical step people often miss, and it’s usually what’s making the frame feel stuck.
Once the caulk is cut, find the nails or screws attaching the window’s nailing fin to the house sheathing and either pop them out or cut them. With all fasteners and sealant gone, the old window should be loose. You can now carefully lift it out of the rough opening, leaving a perfect spot for its new, energy-efficient replacement.
Preparing the Opening for a Flawless Fit
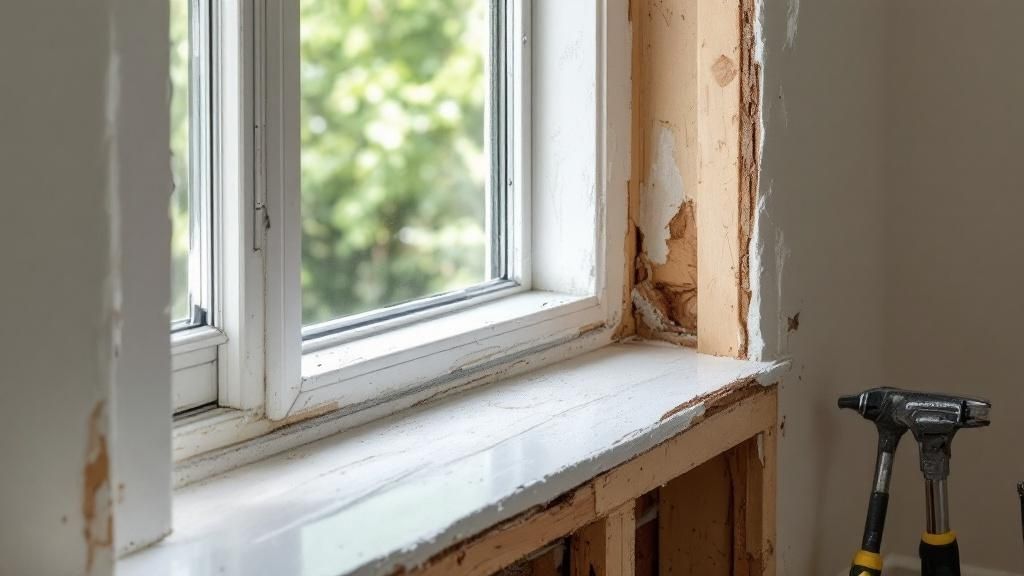
You can't get a perfectly installed window without a perfectly prepared opening. Once the old window is out, your focus needs to shift to creating a clean, solid, and weatherproof foundation for the new unit. This is a non-negotiable step in any professional installation.
For homeowners here in Monterey County, this part of the job is especially critical. Our coastal climate—with its damp, salty air and wind-driven rain—is notoriously tough on building materials. Any shortcuts you take here will almost certainly lead to drafts, leaks, and costly structural damage.
Inspecting for Damage and Rot
Before you do anything else, grab a flashlight and get a good look at the rough opening, examining the sill, studs, and sheathing for any signs of trouble. This is an issue we run into all the time in older homes from Salinas to Carmel, and it’s crucial to address.
Here's what to keep an eye out for:
- Soft or Spongy Wood: Take a screwdriver and gently poke the wood around the sill and frame. If it feels soft or crumbles easily, you’ve found rot.
- Discoloration or Stains: Dark stains, black spots, or obvious water marks are clear signs of moisture getting in.
- Insect Damage: Look for tiny holes, tunnels, or fine sawdust, which could be tell-tale signs of termites or carpenter ants.
If you find significant rot or damage, you have to stop and fix it before going any further. This usually means cutting out the compromised wood and replacing it with new, pressure-treated lumber. Ignoring this is like building a house on a shaky foundation.
Creating a Clean and Level Surface
With the inspection done and any repairs made, it’s time to get that opening clean. Scrape away every bit of old caulk, paint drips, or leftover debris. Your goal is a smooth, clean surface for the new window to sit flush against and for the flashing tape to get a strong grip.
A perfectly level sill is the single most important factor for a window that opens and closes smoothly. An unlevel sill will throw the entire frame out of square, causing sashes to stick, bind, or not lock correctly. Use your level and add shims as needed to get it perfect before you even think about setting the window. This is also the perfect moment to check out our guide on how to measure for replacement windows one last time.
Applying Modern Flashing for a Watertight Seal
Proper flashing is your home’s absolute best defense against water damage, a common concern for homeowners in Monterey and Salinas. The modern self-adhering flashing tapes we use today create a durable, waterproof barrier that old-school methods just can't compete with.
For a truly watertight seal, you have to apply the flashing in the right order:
- Sill First: Apply a continuous strip of flashing tape along the bottom sill, extending it up the sides of the jambs by at least six inches.
- Sides Next: Apply the side flashing strips, making sure to overlap the sill flashing at the bottom.
- Top Last: Apply the top piece of flashing so it overlaps the side pieces.
This shingle-style layering is crucial, as it ensures any water is directed down and out, safely away from the vulnerable rough opening. By taking the time to prep the opening correctly, you’re setting the stage for a flawless, long-lasting installation.
Getting It Right: Setting and Securing Your New Window
This is the moment of truth. Setting and securing the new window is where precision really pays off, guaranteeing smooth operation, a perfect seal, and decades of reliable performance. It all comes down to making the window perfectly plumb, level, and square within the opening.
As a family-owned business serving Monterey County for years, we can't stress this enough: getting this part right prevents a world of future problems. It’s what separates a professional, lasting installation from one that will cause headaches down the road.
The Art of Shimming for a Perfect Fit
First, grab a partner and carefully lift the new window into the prepared rough opening. Your initial goal is to center it side-to-side, leaving a small, even gap on both the left and the right. This gap is where you'll work your magic with shims.
Shims are small, tapered wedges you slide into the gaps to hold the window in place and make those crucial micro-adjustments. We prefer composite shims, especially in our damp Salinas climate, because they won’t rot like wood. Start by placing shims under the corners to support the unit.
Now, grab your 4-foot level and follow these steps:
- Level the Sill: Place your level on the window sill. Gently tap shims underneath until that bubble is perfectly centered.
- Plumb the Sides: Hold the level vertically against the side jambs. Adjust the side shims in or out until both sides are perfectly plumb.
- Check for Square: Measure the window diagonally from the top-left corner to the bottom-right, then from the top-right to the bottom-left. If the two measurements are identical, your window is perfectly square.
This process can feel tedious, but it’s absolutely essential. It’s a principle that applies to many home projects; for instance, the precision needed for how to install kitchen cabinets like a pro uses these same core concepts.
Fastening Without Warping the Frame
Once you’re certain the window is perfectly shimmed, it's time to fasten it. You’ll drive screws through the pre-drilled holes in the window frame or through its nailing fin. It's critical to drive the fasteners directly behind your shims to support the frame and prevent it from being pulled out of shape.
Do NOT over-tighten the screws, as this is one of the most common DIY mistakes we see in Salinas-area homes. Over-tightening can bow or warp the frame, which completely undoes all the careful work you just did with the shims. Drive the screws until they are just snug and double-check that the window is still level.
For homeowners in Salinas or Carmel looking for that professional touch, our team is factory-certified to handle every detail. You can learn more about our dedicated services and our process for replacement window installation.
Troubleshooting Common Installation Issues
Even with careful work, you can run into a few snags. Here's a quick guide to troubleshoot some common issues you might face while setting your window.
| Problem | Likely Cause | Solution |
|---|---|---|
| Window won't open/close smoothly. | The frame is out of square or plumb. | Re-check your level and diagonal measurements. Adjust shims until the sashes operate without resistance. |
| The lock doesn't align properly. | The frame has been warped or is out of square. | Loosen the fastening screws slightly. Re-shim the window to ensure it's square, then re-tighten screws until just snug. |
| There's a visible bow in the frame. | Screws were over-tightened. | Back out the screws in the bowed area. Check for plumb/level again and re-fasten, but do not over-tighten. |
| Diagonal measurements don't match. | The window is not square. | Gently push on the "long" corners of the window to rack it into a square position. Add or adjust shims to hold it there before fastening. |
Taking the time to address these small issues as they arise is what ensures a flawless final product. Don't be tempted to force things—patience and precision are your best tools here.
The Final Seal for Maximum Performance
A properly installed window isn't really finished until it's perfectly sealed and insulated from the elements. This last, crucial stage is what ensures your new windows deliver the energy efficiency and comfort you’re paying for. For homeowners here in Salinas and Monterey, a meticulous seal is what protects your investment against our unique coastal weather.
This part of the job is all about the fine details that lock in performance. It involves filling the gap between the window and the house frame, applying a tough exterior sealant, and reinstalling the trim for that clean, professional look.
Insulating the Gaps for Airtightness
After you’ve secured the window, you’ll see a small gap—usually about a quarter to a half-inch wide—between the new window frame and the home's rough opening. This gap absolutely must be filled with insulation to stop air leaks. If you skip this, you’re creating uncomfortable drafts and undermining your window’s energy efficiency.
The best tool for this job is a low-expansion insulating foam sealant made specifically for windows and doors. Using standard, high-expansion foam is a critical mistake that can bow or warp the new window frame, making it stick or preventing it from locking properly. Stick the applicator nozzle about an inch deep into the gap, lay down a steady bead, and don't overfill it—the foam will expand to fill the void.
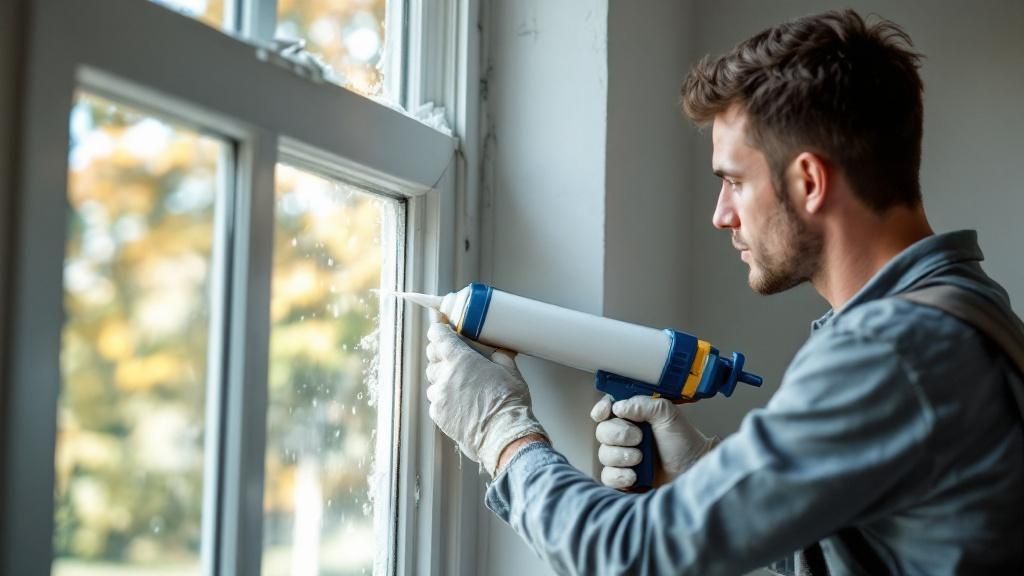
Applying Exterior Caulk for a Weatherproof Barrier
Now it’s time to head outside and create a durable, waterproof barrier that can stand up to California's sun and rain. This is a vital step for preventing water intrusion, a common headache for homes in our coastal communities from Carmel to Marina. A quality exterior caulk job is your first line of defense against moisture damage.
Make sure you choose a high-quality, paintable, exterior-grade caulk that offers good flexibility and UV resistance. For the best results, clean the surface, apply a consistent 1/4-inch bead in one smooth motion, and then tool the joint with a wet fingertip to create a clean, professional-looking line.
A proper seal is the final piece of the performance puzzle. For maximum airtightness, some projects benefit from specialized materials like high-performance Siga sealing tapes. This final exterior seal is non-negotiable for the performance of your new windows and is a key part of our Signature Glass and Windows installation process, ensuring our clients get all the benefits of their new energy-efficient windows.
Finishing with Interior Trim
The very last step is reinstalling the interior trim, which covers the gap between the window frame and the drywall. This is the finishing touch that makes the new window look like it’s always been part of your home's interior. If you were careful when you removed the original trim, you should be able to reuse it.
Position the trim pieces back where they belong and secure them with finish nails. For a truly professional look, use a nail set to sink the nail heads just below the wood surface. Fill those tiny nail holes with wood putty, sand them smooth once dry, and touch them up with paint to match the rest of the trim.
Frequently Asked Questions (FAQs)
How long does a typical window installation take in Salinas?
For a standard project, our professional crew at Signature Glass and Windows can typically replace 8-10 windows in a single day. This timeline can change if we are installing custom windows or if we discover unexpected structural rot in the wall, a common issue in Monterey County's coastal homes that we must repair correctly.
Should I replace all my windows at once or do a few at a time?
While you can do it either way, replacing all your windows at once is often more cost-effective and less disruptive for homeowners in the Salinas area. It ensures a consistent look and maximizes your home's energy efficiency. According to ENERGY STAR, replacing old windows with ENERGY STAR certified windows can lower household energy bills by an average of 12 percent nationwide.
What time of year is best for window replacement in Monterey County?
Thanks to our mild Central Coast climate, we can install windows year-round. However, many homeowners in Monterey and Carmel prefer to schedule their projects during the drier seasons, like late spring, summer, or early fall, to avoid any chance of rain during the installation.
Can I install my own windows or should I hire a professional?
While DIY is possible for those with significant experience, window installation is a high-stakes job. A small mistake can lead to drafts, leaks, and costly water damage. Hiring a local, family-operated professional like Signature Glass and Windows ensures the job is done right and that your manufacturer's warranty remains valid.
How do I know if I really need new windows?
Look for clear signs like difficulty opening or closing your windows, noticeable drafts when they're shut, or condensation between the glass panes. Other red flags for homeowners in Salinas include visible damage like cracked glass, rotting wood frames, or peeling paint. If you see these issues, it’s a strong signal that it's time to consider replacement.
Ready to upgrade your home with beautiful, high-performance windows? As a locally owned, family-operated business with decades of experience, we're here to help. Contact Signature Glass and Windows today for a free in-home consultation. Call us at (831) 269-5355 or visit our website to learn more.